Navigation

Home Craft Works Medicine Tutorial Visit My Shop on Facebook! Dorm Cooking Image Map
Showing posts with label tutorial. Show all posts

Sunday, September 2, 2018

Sticker Storage Tutorial

I just suddenly realized today that I made 2 posts of the same content, the Sticker sheet Tutorial.  Anyways, I just retracted the latest post, haha... lapse on my memory I guess.

Still related to stickers, because I'm into creative / kawaii journaling lately.

For this tutorial I'm almost using exclusive Muji products, this post however is not sponsored by Muji.  There maybe cheaper alternatives, but I just prefer the size of this and I felt Muji products are more available.

Materials
Pin It Now!

Thursday, August 16, 2018

Sticker Sheet Tutorial

I'm into photojournaling lately and I'm kind of addicted to stickers.  I'm sticking them in my planners, bullet journals and journal. I guess I'm kind of  forcing myself to look into other things and not focus on all the negative things my mind is replaying in my head over and over.  Journaling kind of tries to force my mind away from it.

And so I've been buying lots of stickers, in fact I'm kind of looking for a sticker album.  I remembered when I was in gradeschool, I have 1 notebook filled with shiny pages, those pages were similar to the back of a sticker paper.  And I place my stickers in it, and we even exchanged notebooks with my friend.  I'm kind of looking for it again... If you any place or online store that sells these types of notebooks, please comment below.

So I bought lots of sticker flakes and sometimes it's just irritating since it's difficult to remove the back of the sticker... So I thought of putting those sticker flakes into something so it'll be easier to remove by the time when I needed it.

Let's get on with this simple tutorial:

Materials:

Pin It Now!

Friday, September 22, 2017

How to Foam Up Perfect Whip Facial Wash

I always have this question in my mind, can I put the Shiseido Perfect Whip in a foam dispenser? My life will be easier that way.  Because Speedy Whip is so expensive and the perfect whip is more affordable.  But I don't like to go through 2 minutes to foam up the Perfect Whip in my hand.

So when I finished my Biore Uru-Uru I used the empty foam dispenser to test this lazy idea of mine if this will work.
Pin It Now!

Friday, April 7, 2017

DIY Cushion

I find that the Holika Holika Aqua Petite Jelly BB Cream bottle is too bulky for travelling.  It's summer already and I think we should be able to bring some of our favorite products to travel.

I haven't come across a blog post on how this will perform if it's in a cushion form.  I mean I will not alter the formula right?  But most of the DIY cushion tutorials use liquid foundation or BB cream in their DIY Cushions. Well wouldn't hurt anyone to try.

Pin It Now!

Thursday, March 2, 2017

How to Fix Broken Highlighter Palette

I was so excited to check my mail last night,  well because a package arrived.  I bought a highlighter palette which was raved about in social media, the Too Cool For School Artclass by Rodin Highlighter Palette.  But to my horror, when I opened the palette, it was BROKEN!  The courier must have dropped it during delivery... 😟

So here's how the palette looked like when I opened it.
Pin It Now!

Saturday, January 28, 2017

How to Hide You've Been Crying

No matter how hard we try to prevent it, sometimes, we cannot help it but cry.  Whether it's because you broke up with your loved one, you watched a tear-jerking movie, you were hurt, you were depressed etc.

After you stopped crying,  you are now in a dilemma of going outside, you can't let people see you looking with red puffy eyes and nose from all the tears your eyes produced and redness of your nose from blowing into the tissue.

After gaining your composure and emotions... it's time to bring out your makeup kit.

1. Wash your face, preferably with cool or cold water. You can apply something cold over your eyes, like cold towel or spoon to decrease puffiness of your eyes.


2. Moisturize your skin with your moisturizer and apply sunscreen.

3. Apply medium to full coverage foundation.
Here, I used Laneige BB cushion shade C13.

4. Apply your concealer to your eyelids, under eye, nose to cover the 'redness'
The Saem Concealer in shade no. 1

5. Apply a white eyeshadow to the inner corner of your eyes.
Nyx Jumbo Eye Pencil - Milk

6. Apply your everyday eyeshadow, eyeliner, mascara, blush-on, lip tint
Here, I've used my Canmake gold, orange, brown eye shadow, Holika Holika jewel pen (gold), Peripera brown liquid eyeliner pen, Heroinemake long and curl mascara. For my blush-on, I used Etude House pink powder blush-on and Labiotte wine tint for my lips

7. And you've concealed to the people you just cried.


Do you have other tips to hide that you cried? We would like to hear from you.
Pin It Now!

Saturday, December 31, 2016

How to Fix Broken Lipstick

Let's end this year with a tutorial, I've raved about how good is the Happy Skin Moisturizing Lippie Disney Collecction.  One of its disadvantage however is since it's so buttery, it broke!  Most of my lipsticks can withstand the normal forces inside my handbag or shoulder bag.  So this is the first time I had a broken lipstick.

Materials you'll need

  • clean plastic
  • lighter/candle
  • refrigerator
Here's how my broken lipstick looks like

  1. Place the top broken part  (left part of the picture) on top of a clean plastic sheet and place in refrigerator for 2 minutes
  2. Once the part is cold, use the plastic to hold it, to avoid having your fingerprints when you hold the top part
  3. Hold the broken part over a flame.

  4. Once a little part has melted, you can attach it back to the tube.


  5. And it's fixed! If it breaks again, you can just attach it again with the same technique.
Happy New Year everyone!
Pin It Now!

Saturday, December 3, 2016

Poison Ivy Armband & Legband Tutorial

Another part of Poison Ivy Costume DIY
You can check the Socks Boot Cover Tutorial & the Headdress Tutorial to know how I made those accessory and you can check the overall look in here

Now let's start with my very childish introduction:
Of course Uma Thurman's version of Poison Ivy Costume wouldn't be complete without the glitters!!!!

I don't have time to put on body glitter, so I decided to make an armband and legband (if that's what it's called) instead.

Materials:
Green felt fabric (hard)
Paper & Pencil
Green & Gold glitters
PVA Glue
Elastics
Sewing Kit


Step 1 - Measure your arm width and your leg width and cut the appropriate elastic length.  Sew the two ends together to form a ring. Draw different sizes of leaves into your paper.
Step 2 - Cut these patterns and use them as guide to cut your felt fabric shapes.  Cut many shapes using the different sizes of leaves.

Step 3 - Place some glue onto your felt fabric and pour glitters over them!!  Allow to dry
Step 4 - Glue the pieces onto the elastics.  Remember to use only drops of glue, do not glue the entire elastic and just place the leaves on top, this will harden the elastic and it will not be elastic anymore. 


And you're done!


Pin It Now!

Poison Ivy Headdress

This is a part of Poison Ivy Cosplay tutorial series. You can check how I made the boot cover using in this page: Socks Boot Cover Tutorial
The arm band and leg band can be found here: Arm Band & Leg Band Tutorial
The overall look can be found here: Poison Ivy Cosplay

Let's first look at our inspiration for the headdress:

The version played by Uma Thurman is one of my favorite versions of Poison Ivy Costume.

Materials needed (I bought everything in Dangwa, except for pliers and glue gun):
red headband
plastic leaves
fake fabric red roses
wire
pliers
glue gun
Fake red crystals / sequin flowers


Step 1 - Remove all the rose buds from the fake flower stem.  Remove also some small leaves from the leaf bouquet.


Step 2 - Using your hot glue, glue the roses into your red headband.
Step 3 - Wrap the wire of your crystals and sequin flowers in between the roses.


Step 4 - Glue in the plastic leaves.  

Step 5 - You're Done!!!!
Here's a picture when worn.

Pin It Now!

Monday, March 28, 2016

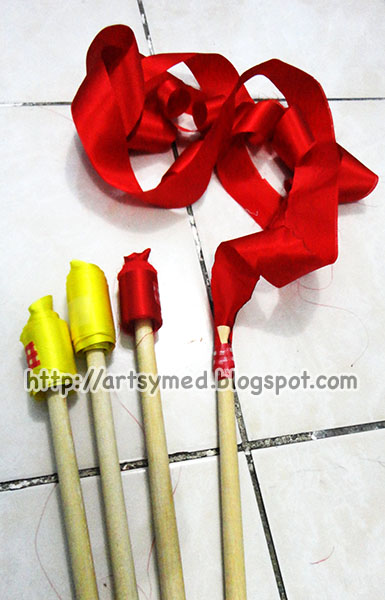
Ribbon Wands - Tutorial

We'll be performing ribbon dance and I have to make some props.  Ribbon wands of course! What's a ribbon dance w/o ribbon wands?

Materials:


  • Long silk ribbon
  • Dowels - I bought mine from @binondopabili (Instagram account)
  • Washi Tape or Masking Tape
  • Scissors
  • Lighter
Step 1 - I heated the ends of my ribbon to avoid having frizz mess.


Step 2 - Attach 1 end perpendicular (upright) to the end of the dowel stick.


Step 3 - Secure the end with wash tape or masking tape.

And you're done!

Pin It Now!

Sunday, March 27, 2016

Socks Boot Cover Tutorial

I'll be doing a cosplay soon for an event.  I've been looking for green boots for the look of the character.  But unfortunately, the 2nd hand shoes in OLX are too big for my size, plus I'm not used to wearing boots, so I'm not sure if my feet can tolerate wearing one.

I went to 2 malls, Robinsons Magnolia & SM San Lazaro, no shoes to match the look.  There are green high heels but my feet can't tolerate them... They really HURT! How on earth do people and actresses run in those things?!

I then thought of why not boot covers? Since they're popular to cosplayers, as alternative for their shoes.  You can wear your own high heels which has been proven to be comfortable for you and plus, they're cheap and easy to make.

I asked around Facebook & online shops, how much will it cost me to have one made.  They answered Php 1500.  Expensive! I might as well buy a new pair of boots!

Anyways here is a 'cheat', on how to make boot cover:

Materials:

  • A pair of thick socks
  • Scissors
  • Your high heels/boots


Step 1 - Insert the socks into your shoe.


Step 2 - Cut a small hole at the heel part of the shoe over your socks.


Step 3 - Slide the heel into the hole you've created.


Step 4 - Do the same with the other pair.


And you're done!

Summary:

To see the overall Poison Ivy Look: Poison Ivy Cosplay
To see the respective DIYs in the series: Poison Ivy Arm Band & Legband TutorialPoison Ivy Headdress Tutorial
Pin It Now!

Sunday, April 5, 2015

Gelatos card

Craft break, that's what I really needed with all the stress inside the hospital. So with the lenten season, I promised myself craft healing. Meaning, rejuvinating myself through crafts that I missed doing since the start of the year.

I challenged myself to make at least one project in one og the foloowing craft categories: paper craft, needle felting, beading

Here's my entry to the paper craft.  Wait for my other projects.

Here I used my gelatos not only for the amber background but also for the shading and color of the towers. I regretted though me outlining the towers since I think the one without the outline looked better.

Pin It Now!

Saturday, August 23, 2014

Flash Cards Cover

I've recently read that taking quizzes are best for remembering stuffs. In service is just 2 weeks away. Got to cram all possible info in.

Materials:
Remembering manila printed sheets kit (from National Bookstore)
Puncher
Scissors
Glue tape
Metal keyring
Index cards


1. Trace the size of your index card to your cardstock and cut out
2. I cut out a rectangle from a pattern included in the kit.
3. Write your name and glue the pieces together.

Pin It Now!

Monday, March 24, 2014

Ombre bookmark

Here's my 1st project with Faber Castell's Gelatos. It's amazing that these things blend so well. And is perfect for the ombre effect. I have to look for papers for wayercolor though since the regulat cardstock softens and some layers thin out.
First color in woth gelatos just like any crayons.
Then with a wet wipe, gently blend in the colors to get this ombre effect
I then used this stencil bookmark I bought at National Bookstore before and drew in the birds using unipin.
 
I then protected the surface woth vinyl sticker paper. 
Pin It Now!