Navigation

Home Craft Works Medicine Tutorial Visit My Shop on Facebook! Dorm Cooking Image Map
Showing posts with label craft. Show all posts

Tuesday, February 5, 2019

Achieving the Dream: Take Me Back to Michael's

Since med school days, I've always wanted to be able to visit this store.  I came to know about it since grade school days, I've watched American craft shows and this store is always mentioned to where you can get your materials and supplies.

As a kid, I've always wished there's something like this one in the Philippines, actually there was one before, I think the name was Craft World, I would go to Robinson's Galleria and SM Megamall just to go to that store.  Sadly it closed down already.

Actually I did not dream of going to Michael's until med school days.  I mean, in gradeschool and high school days, I never fully posted or put into words that I wanted to visit Michael's store.  My desire to visit the place started 2012, med school days.  I posted in social media that I wanted to visit it someday and I wanted something like this in the Philippines.

So last May 2018, when I visited San Francisco, I made it a point to include this in my itinerary.  We checked in a hotel in Union Square, and the branch closest was in Emeryville.  So using Moovit app and uber, we were able to reach this place.


I was really happy and with a feeling of accomplishment when I reached the storefront.  And when I entered the store, OMG! I was in Craft Heaven!!!!  I never thought there were so much types of crafts in the world.  Everything is just there! It's "THE ONE"-stop shop for your craft needs.

There's just this overwhelming joy I can't fully explain.  I bought lots of paper crafts there.  I would have bought some needle-felting also if only I did not restrain myself.  If only I was not worried of having our luggages overweight, I would have bought some craft tools as well.

Below is a picture of my Michael's Haul:

I loved that there were soccer-related stuffs there, I just hoarded!!!  Right now, I haven't used all of it, little by little, tinitipid since it was a really long way there and my 1st time shopping there.

Bucket list checked.

Hope I can achieve more of my dreams.  Dreams are not just for the your younger self, not just in the Disney movies and cartoons.  Even if you're already in Med school you can still dream and even if it took me 6 years I was able to achieve it nevertheless.  And this feeling of achievement is just irreplaceable.

Never stop dreaming, never stop believing.
Pin It Now!

Saturday, January 19, 2019

Creative Journaling

I've been journaling since I was in college, actually I think even as early as high school.  I love buying cute notebooks and I write my diary using different colored pens.  There was actually a point in time when I went into depression and thanks to our college guidance counselor, she suggested journaling as a way for one to get out of depression.  I also had a dream journal. During that time wherein I would write what happened in my dream and would interpret them.

Pin It Now!

Thursday, August 16, 2018

Sticker Sheet Tutorial

I'm into photojournaling lately and I'm kind of addicted to stickers.  I'm sticking them in my planners, bullet journals and journal. I guess I'm kind of  forcing myself to look into other things and not focus on all the negative things my mind is replaying in my head over and over.  Journaling kind of tries to force my mind away from it.

And so I've been buying lots of stickers, in fact I'm kind of looking for a sticker album.  I remembered when I was in gradeschool, I have 1 notebook filled with shiny pages, those pages were similar to the back of a sticker paper.  And I place my stickers in it, and we even exchanged notebooks with my friend.  I'm kind of looking for it again... If you any place or online store that sells these types of notebooks, please comment below.

So I bought lots of sticker flakes and sometimes it's just irritating since it's difficult to remove the back of the sticker... So I thought of putting those sticker flakes into something so it'll be easier to remove by the time when I needed it.

Let's get on with this simple tutorial:

Materials:

Pin It Now!

Tuesday, May 1, 2018

Giraffe Body Painting - 1st Time Experience

Just finished crying, I couldn't write a blog just a while ago, but after I've found composure decided to write something to lift my spirits up at least just a little.

I've written that one of the induction to PUA as an incoming urology resident is Body Painting.  Here's my experience as the contestant.  Now, I'm sharing the experience, as the painter.  This is my first time doing body painting.  With no experience, without studying about it, just do it, "Bahala na si Batman".

So I was requested by my junior to help him out in his body paint.  I didn't agree at first, well because I've been so tired lately.  I felt blank, unmotivated, tired etc...  Eventually, after around 3 days since he requested, I somehow was able to recover so I found myself in front of his poster paints.

Warning though, DO NOT USE Poster Paints to your skin.  There's a reason why there's such a thing as body paint.  Poster paints were not made to be placed on your skin.  But these were just the paints bought by my junior so I have no choice anyways but to use them.

So below were the materials: yellow, brown and black poster paints, paint brushes, bowls and makeup sponges.
Pin It Now!

Thursday, March 1, 2018

Otterly Beautiful Day - Shaker Card

I'm starting my birthday month with spreading happiness.  Hope I can have the time to push this through.  February was a sad month for me.  I guess I just have to counteract this negativity for some time.

Starting with very cute otters!  This was my first time to use Copic Markers, I think I have to have some learning curve using these markers, even knowing about the proper paper.

Pin It Now!

Monday, February 27, 2017

A Simple Act Producing Full of Joy

Have you ever experienced before wherein a stranger, did some random act of kindness which made you really, truly happy that you will remember it for the rest of your life?

During that time, your heart was filled with so much joy that nothing could ever destroy your day.  And not all people have the luck and opportunity to experience that especially if you receive it from your idol.

Mr. Jerrod Maruyama is my favorite Graphic Artist, I literally have a folder in my computer containing all of his works.  And it gives me great inspiration seeing all his kawaii works.  Whenever I have my phone cases customized, it's always a Jerrod Maruyama design.  That's how much I love and adore him.

When your in the medical field, you're taking care of sick people, some in one of their lowest times of their lives, and sometimes, you get affected of the negative energy revolving inside the hospital.  Crafting has always been my escape and it has forever given me my touch of positivity.  It never left me alone when I was depressed.  It's very patient, that despite I don't have time to make anything crafty and artistic, arts and crafts have never left my side. 

So when I decided today to think of something or an event that made me really happy, I thought of this event which happened last July 30, 2014.  When one of my creations was featured by my favorite artist from another side of the world!!!  Featuring my work, from a humble resident physician in the Philippines.  Who could ask for more?!

Pin It Now!

Sunday, December 25, 2016

Sending Smiles this Christmas

Ever since I underwent surgery and in the process of recovering and struggling between the ups and downs of my thyroid hormone levels, I thought of doing an artsymed project.  I thought of giving christmas cards away to people who have come to touch my life in some way or the other.

I can still remember my teachers' smile whenever they receive delivered christmas cards in highschool.  In highschool, the student council has a project of delivering christmas cards to whomever you want it delivered.  And I can still remember how excited students were in waiting for christmas cards to arrive and their happiness when they receive these cards.

So this year's Artsymed Christmas Project was that I hope to send smiles to people.  As you could see in my previous post, while recovering from surgery, I experienced depression and making cards somehow helped me lessen my sadness.  I can still remember crying when I made these cards, they helped me through depression, when I was all alone. But I would smile everytime I can see these cards done, I hope these cards can send smiles to others as well.

Here are a few cards I made for this christmas season:

Pin It Now!

Saturday, December 10, 2016

Closet Costume: Gatsby

There's a trend to making themed parties here in the Philippines, not only children, but adults as well will be dressing up to parties.  One of my favorite costumes or theme is the Great Gatsby.  I love this theme because of its flexibility and it's all about the Accessory, and they look really great in pictures!

Let's be practical, there are some people who will not be willing to spend a lot of money to buy a costume to be used only one night or one party.  But you wouldn't want to be left out in the themed party right? So there should be a compromise between practicality and being true to the theme.

PS: I'll be tackling the female costume only here.

Let's first take a look what do gatsby-inspired costumes look like


Let's break this down, these are the basics:
  • The great gatsby has a general theme of: black, white, gold, silver.  You can use the other colors but generally these colors center on this theme.
  • Like I said before, this theme is all about accessory/props: feathers and pearls.
  • Makeup: Red Lipstick
Pin It Now!

Monday, December 5, 2016

Doctor's Guide to Organizing an Appreciation Party

Whenever doctors have an event, we're challenged to do some event planning, which is not our forte, well, that's why we're doctors and not event planners... But we are usually on a tight budget, so we can't hire an event planner to make our lives easier and oftentimes, we have no choice but to do the organizing ourselves.

This is a resident's guide, since I'm still a resident and I would like to share what I've learned in becoming one of the organizing committee in a mini Appreciation Night.

Disclaimer: Things written here are product of collaboration of all the ideas of residents and consultants and not all of my own...

Two important things in any event are: MONEY & TIME, and more often than not, we don't have much of both. We'll just do what we can with what we have.
Pin It Now!

Saturday, December 3, 2016

Poison Ivy Armband & Legband Tutorial

Another part of Poison Ivy Costume DIY
You can check the Socks Boot Cover Tutorial & the Headdress Tutorial to know how I made those accessory and you can check the overall look in here

Now let's start with my very childish introduction:
Of course Uma Thurman's version of Poison Ivy Costume wouldn't be complete without the glitters!!!!

I don't have time to put on body glitter, so I decided to make an armband and legband (if that's what it's called) instead.

Materials:
Green felt fabric (hard)
Paper & Pencil
Green & Gold glitters
PVA Glue
Elastics
Sewing Kit


Step 1 - Measure your arm width and your leg width and cut the appropriate elastic length.  Sew the two ends together to form a ring. Draw different sizes of leaves into your paper.
Step 2 - Cut these patterns and use them as guide to cut your felt fabric shapes.  Cut many shapes using the different sizes of leaves.

Step 3 - Place some glue onto your felt fabric and pour glitters over them!!  Allow to dry
Step 4 - Glue the pieces onto the elastics.  Remember to use only drops of glue, do not glue the entire elastic and just place the leaves on top, this will harden the elastic and it will not be elastic anymore. 


And you're done!


Pin It Now!

Poison Ivy Headdress

This is a part of Poison Ivy Cosplay tutorial series. You can check how I made the boot cover using in this page: Socks Boot Cover Tutorial
The arm band and leg band can be found here: Arm Band & Leg Band Tutorial
The overall look can be found here: Poison Ivy Cosplay

Let's first look at our inspiration for the headdress:

The version played by Uma Thurman is one of my favorite versions of Poison Ivy Costume.

Materials needed (I bought everything in Dangwa, except for pliers and glue gun):
red headband
plastic leaves
fake fabric red roses
wire
pliers
glue gun
Fake red crystals / sequin flowers


Step 1 - Remove all the rose buds from the fake flower stem.  Remove also some small leaves from the leaf bouquet.


Step 2 - Using your hot glue, glue the roses into your red headband.
Step 3 - Wrap the wire of your crystals and sequin flowers in between the roses.


Step 4 - Glue in the plastic leaves.  

Step 5 - You're Done!!!!
Here's a picture when worn.

Pin It Now!

Sunday, September 11, 2016

Pig Sliding Card

When you receive anything handmade, you get this feeling of 'special-ness'? (I think this word doesn't exist, hahaha).  Don't you? That I believe is the power that handmade has vs the commercial products.  But I've always believed that to get this maximum effect of handmade gifts, the person receiving it must be capable of appreciating handmade.  Not all people can appreciate handmade gifts, do you agree?

I think my thyroid hormones are giving me hope already, since I can make something crafty already.  I was depressed and weak the past few days and unable to make anything crafty or artsy.  

This project is inspired by Stamparadise. I don't have the stamps available here, so I just used my computer to make the template, and traced the outline w/ waterproof ink since I used watercolor pencils for my color and Faber Castel Gelatos

Materials used:
Watercolor paper
Faber Castel Gelatos
Faber Castel Watercolor Pencils
Cutter
Scissors
Wet wipes
Printer
Adobe Photoshop CS6
Unipin Pin Pen 0.01 mm Black
Sakura Pigma Micron Pen 01 Black
Butterfly foil stickers (From National Bookstore)

Here's the Card in action:


Aren't the pigs so adorable??

If you want to have a copy of the template, just comment down below, I can email the file to you.


Pin It Now!

Monday, March 28, 2016

Ribbon Wands - Tutorial

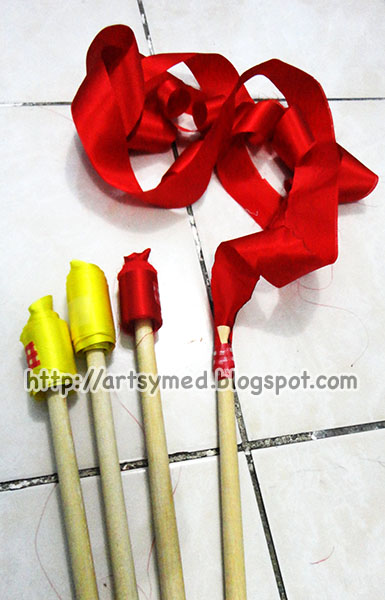
We'll be performing ribbon dance and I have to make some props.  Ribbon wands of course! What's a ribbon dance w/o ribbon wands?

Materials:


  • Long silk ribbon
  • Dowels - I bought mine from @binondopabili (Instagram account)
  • Washi Tape or Masking Tape
  • Scissors
  • Lighter
Step 1 - I heated the ends of my ribbon to avoid having frizz mess.


Step 2 - Attach 1 end perpendicular (upright) to the end of the dowel stick.


Step 3 - Secure the end with wash tape or masking tape.

And you're done!

Pin It Now!

Sunday, March 27, 2016

Socks Boot Cover Tutorial

I'll be doing a cosplay soon for an event.  I've been looking for green boots for the look of the character.  But unfortunately, the 2nd hand shoes in OLX are too big for my size, plus I'm not used to wearing boots, so I'm not sure if my feet can tolerate wearing one.

I went to 2 malls, Robinsons Magnolia & SM San Lazaro, no shoes to match the look.  There are green high heels but my feet can't tolerate them... They really HURT! How on earth do people and actresses run in those things?!

I then thought of why not boot covers? Since they're popular to cosplayers, as alternative for their shoes.  You can wear your own high heels which has been proven to be comfortable for you and plus, they're cheap and easy to make.

I asked around Facebook & online shops, how much will it cost me to have one made.  They answered Php 1500.  Expensive! I might as well buy a new pair of boots!

Anyways here is a 'cheat', on how to make boot cover:

Materials:

  • A pair of thick socks
  • Scissors
  • Your high heels/boots


Step 1 - Insert the socks into your shoe.


Step 2 - Cut a small hole at the heel part of the shoe over your socks.


Step 3 - Slide the heel into the hole you've created.


Step 4 - Do the same with the other pair.


And you're done!

Summary:

To see the overall Poison Ivy Look: Poison Ivy Cosplay
To see the respective DIYs in the series: Poison Ivy Arm Band & Legband TutorialPoison Ivy Headdress Tutorial
Pin It Now!

Friday, March 18, 2016

Craft Fail - customized WIFI skin

Learning is a process of success & failures. I think it's time I also place my failures here, so that other crafters may learn from my mistakes.

I made a customized wifi device skin last 2012(Customized WIFI Skin).With the advent of 4g and LTE internet, I bought another 4G compatible device, which did not last long since my senior resident lost it when he borrowed it.  So time to use again my old wifi device.

Now comes how the skin survived the times...


The vinyl sticker is still intact, it still protects the wifi device, but the print already melted. Probably from the heat of the battery when turned on.

Lessons learned: 
Can't use inkjet printer ink, to skins that will be placed to devices that produce heat.

Til the next craft project!
Pin It Now!

Tuesday, April 7, 2015

What I Love Bracelets & Earrings Set

For my entry in the beading category, here are bracelet & earrings set.

I think the common theme I have for this collection is what I love.
In General:
Project type: Bead
Project time: 2 hours for 4 sets
Project date: 4/3/15

 Pink Makeup
Bracelet & Earrings Set
Whenever I see the touch of pink, I remember the shades of pink of the makeup I wear.  I really love the color of pink makeup.
 My Love for Tea Outside
Bracelet & Earrings Set

This bracelet symbolizes my love for tea.  The heart symbolizes "love", teapot symbolizes tea, butterfly symbolizes nature.  All the things I love in different shades of my favorite color.
 Lucky Green
Bracelet & Earrings Set
Green symbolizes a lot of things: wealth, nature, healing.  Jade is perfect for good luck companion in your everyday activities
White Grape Cocktail Drink
Bracelet & Earrings Set
Whenever I want to celebrate, I always buy Welch's grape cocktail juice, either in red or white grape, it's the perfect companion for any celebration!
Pin It Now!

Monday, April 6, 2015

Zombiefied Kitty

This is my entry to my Craft rejuvination for the Lenten Season under the needle-felting category.

I was thinking of a zombie matryoshka, however it turned out to look like a zombified Hello Kitty.  What the heck, I kind of am confused of what it looked like: a zombie vs a monster?


Pin It Now!

Sunday, April 5, 2015

Gelatos card

Craft break, that's what I really needed with all the stress inside the hospital. So with the lenten season, I promised myself craft healing. Meaning, rejuvinating myself through crafts that I missed doing since the start of the year.

I challenged myself to make at least one project in one og the foloowing craft categories: paper craft, needle felting, beading

Here's my entry to the paper craft.  Wait for my other projects.

Here I used my gelatos not only for the amber background but also for the shading and color of the towers. I regretted though me outlining the towers since I think the one without the outline looked better.

Pin It Now!

Wednesday, November 19, 2014

Mickey Mouse Tsum Tsum

Yesterday was one of world famous mouse' birthday, Mickey! In celebration of my love for Mickey, I've created a new woolcandie dedicated to him.

At pressent, there's a trend in the Surgery staffroom in playing Tsum Tsum! I learned about this game from Jerrod Maruyama in one of his facebook posts, and I love playing it since the characters are so cute!

Let's begin this tutorial, something unique with this project is that I tried mixing wet and dry felting techniques. This is a first for me to see the effects. 

Materials:
You'll need your basic felting needle, sponge and wool roving: red, black, white, cream, yellow
Hot water, soap for your wet felting

Let's begin!
1. I apologize for not able to take picture of me doing wet felting, living alone in dormitory with both hands in soapy water, I was not able to figure out how to take a picture yet. Anyways, basically you use your black roving and make an elliptical shape with soap and water. Then your let it dry.

2. With your cream wool, make mickey's face. You can use silver pen to guide you in your needle-felting.


3. You cover the lower half of his body with red wool.

4. You use black wool to shape 2 half circles for the ears.

5. Attach the ears to Mickey

6. Make mini tear drop shapes using your white and yellow wool. Attach to Mickey's bottom part.

7. Make a string like shape with black to attach as his tail.
8. Make 2 ellipticals in Mickey's shorts

9. Now make his face

And your done!
I tried attaching a headpin to make it a phone charm

So cute!


Pin It Now!